Crossing realities tutorial
Daywhat?
So, Google finally released the Daydream headset and controller, but what is Daydream anyway? Well, Daydream is not only about hardware, its also a set of specifications. To be able to use the Daydream controller a phone must have Google’s “Daydream seal of approval”, which means that it has been deemed powerful enough to run VR apps. This might look like an annoying limitation, but it’s actually a good thing for two reasons. First, it gives us developers a base hardware to work on, so we can be sure that any VR app built for a Daydream phone will run smoothly on other Daydream devices. And last but not least, it gives users an idea of which devices they should use to run VR apps, so they don’t shout “VR is sh**!” and turn completely away from it because they had a bad experience on a device not powerful enough for VR.
I want to take control!
From a technical perspective the headset is like a standard Cardboard, with the addition of a headband so you don’t have to hold it. It’s also a lot more comfortable than any other Cardboard I tried.
The controller is a lot more interesting, first because it increases a lot the possible interactions. Without it you only have one single button to do all your interactions, which means that most of the time you have to trick your way out of this issue.
The controller is about 10cm long and 3.5cm wide. It features a circular touchpad that also has a pressure button, a Home button and a second button that you can configure (plus 2 volume buttons). I would personally have loved the controller to also have a trigger, but it would have required a bigger one.
It can track its own orientation as well as the rotation speed and acceleration. BUT it CANNOT track its position. Concretely, it knows where it’s pointing at, so you can point it in a direction to select an object, but it doesn’t know if you are moving your arm forward and backward (or left and right), so you can’t move the controller on a virtual object to grab it. This is the main difference with the HTC Vive controller.
How do I start?
If you want to have fun with the controller and create your own Daydream apps in Unity here is what worked for me:
1. Get Daydream technical preview
You need a special version of Unity called Unity Daydream technical preview. You can get it here. Once you’ve downloaded it install it like a normal Unity version, it should be rather straightforward but if you have difficulties look at my previous blog post on how to configure Unity for Cardboard. By default it should install next to your normal Unity version (if you have any) and not overwrite it. You can check the name of the installation folder to check this. It also means that you must be careful and not open the wrong version of Unity…
While it’s installing you can download Android SDK 24.
2. Download Android Nougat SDK
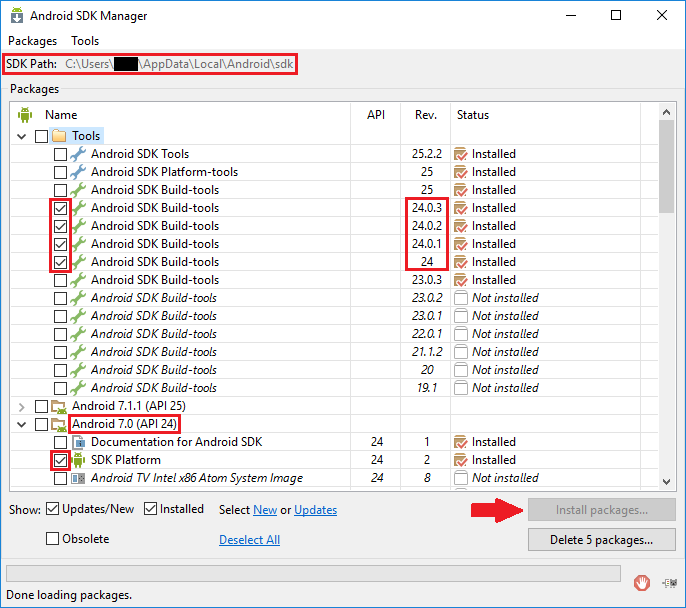
In order to compile your Daydream apps you need the SDK Platform and Android SDK Build-tools for Android 7.0 (API 24). To get that, launch the Android SDK Manager, either from Android Studio as described here or from command line: Mac ~/Library/Android/sdk/tools/android and Windows C:\Users\<user_name>\AppData\Local\Android\Sdk\tools\android.bat (replace <user_name> by your actual user name). WARNING: Those paths may vary depending on how you installed the SDK Manager.
If you don’t have Android SDK Manager then you can either download all Android Studio or Get just the command line tools here. If you choose the second option extract the file to the desired location and launch ./tool/android from the command line.
Then you should have a window like this:
Check the boxes as shown in the image. The Android SDK build-tools 24.0.1, 24.0.2 and 24.0.3 may not be needed but I installed them just in case. Then click on Install packages… and go get a coffee while everything is installing.
3. Set the Android SDK path in Unity
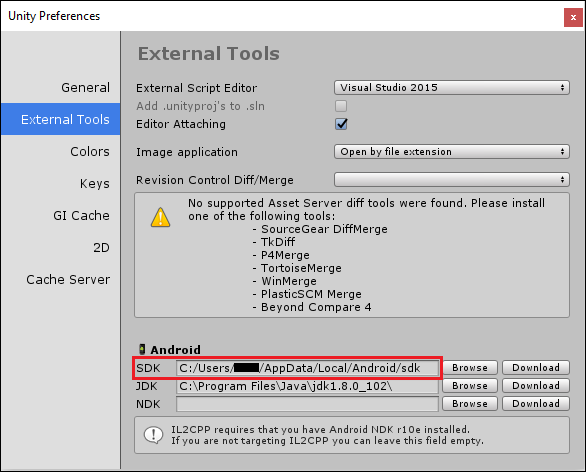
Now you need to set the Android SDK location in Unity (the new Daydream technical preview Unity version that you just installed). To do this open Unity and create a new empty project. Go to the preference menu (Mac Unity > Preferences..., Windows Edit > Preferences...) and to the External Tools tab (on the left). Here you can check the Android SDK path, make sure it’s the same that as the one indicated at the top of the Android SDK Manager window.
4. Change the Player Settings
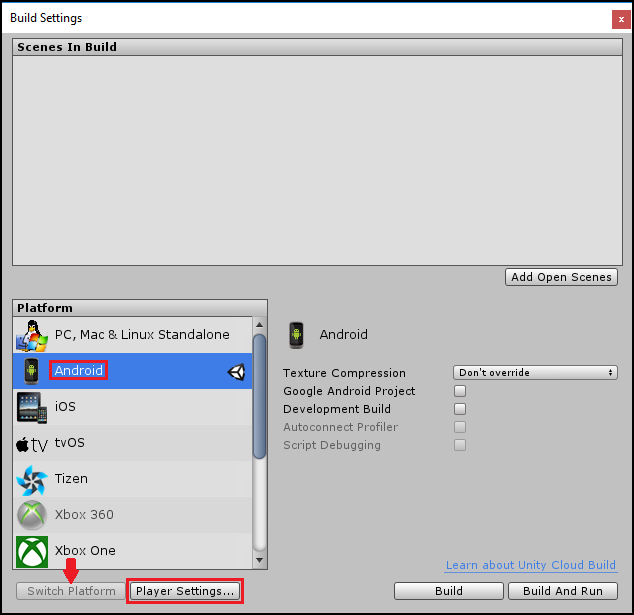
For every Daydream project that you create in Unity you need to set some parameters in the Player Settings section. First make sure that you are targeting Android for your builds. Open the Build Settings window (File > Build Setting...), click on Android and click on Switch Platform. Wait for Unity to do its magic then click on Player Settings....
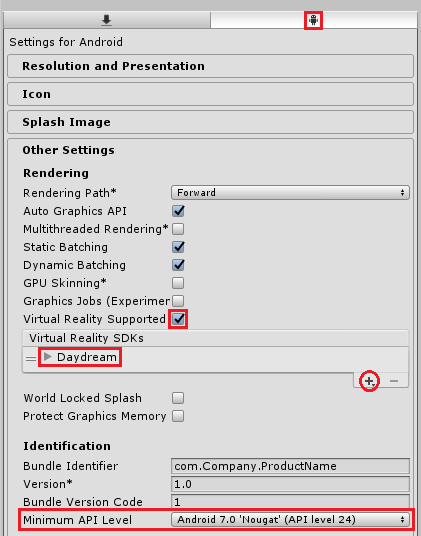
Here go to the Other Settings section and check Virtual Reality Supported. On the list that appears under (Virtual Reality SDKs), click the plus button and select Daydream from the list. Change the Minimum API Level to Android 7.0 'Nougat' (API Level 24).
5. Get and import the GoogleVRForUnity.unitypackage
To get all the Daydream components for Unity you need to import the GoogleVRForUnity.unitypackage. You can get it here, just click on Download on the right. When it’s downloaded import it in Unity either with a double click on the file or from Unity Assets > Import Package > Custom Package.... Select all and click Import.
NOTE: If you are working with an existing Cardboard project delete the GoogleVR and Plugins folders from the Assets folder before importing.
6. Test with Google Demo App
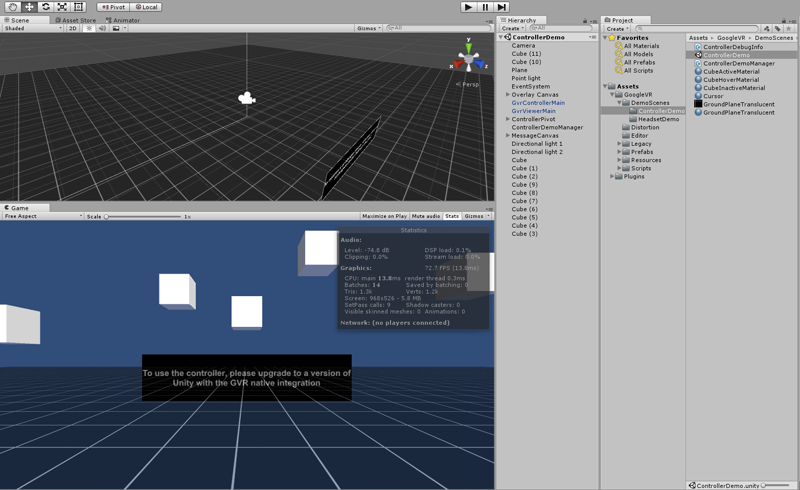
Now let’s see if everything is working fine! Open the ControllerDemo scene (GoogleVR > DemoScenes > ControllerDemo > ControllerDemo). You should see this:
I didn’t hear of any way to have the controller working in Unity emulator (unless you use a phone to emulate the controller, but the point here is to use the actual controller…). So you will have to build the app to your Pixel.
Remember to change the Bundle Identifier in the Player Settings, like for any other Android app in Unity. Then click File > Build & Run.
NOTE: Like for any Android app you need to Enable USB debugging on your device as described here.
When it’s done building, follow the instructions on your phone. The app features several cubes that turn orange when you move the pointer over them. You can move them around by touching and holding the touchpad when pointing at one.
And here we are! You are all set up to create your how apps!

Gimme more!
Here are a few other things you could find interesting.
Good to read
Google’s documentation for Daydream controller.
Want to publish an app on Daydream special store? You will need to register to Daydream Access Program.
Test our quick Daydream game prototype!
In the 2 days that followed our reception of the controller I put together a small game for Daydream. You can get it for free from Google Play here. We plan on adding a lot more content and better art (whenever we get the time ^^‘). Here it’s mainly done with free models.
Remove part of the useless controller emulator stuffs
Right now the prefabs for Daydream still have parts for the controller emulator (with a phone, Cf previously). This is useless with the real controller. I didn’t manage to disable it completely but you can turn off part of it by going on your GvrControllerMain GameObject and select OFF for Emulator Connection Mode on the Gvr Controller script.
While building an app for Google Play Store
If you want to release a Daydream app on Google Play Store you need to add special icons for Daydream (else the store refuses the .apk). You can set them in the Player Settings... Other Settings section. Click on the small arrow next to Daydream.
